


How Does an Ultrasonic Sensor Measure Distance? A Simple Guide for Beginners

Have you ever wondered how a robot knows that there is an object in front of it?
How does a car’s parking sensor detect an obstacle?
How can a smart dustbin open its lid when you bring your hand near it?
Or how can an electronic system measure the water level inside a tank without touching the water?
The answer to many of these questions is distance sensing.
One of the simplest and most popular sensors used for this purpose is the ultrasonic sensor.
You may have seen the small sensor with two round metal components that look like two eyes. This is commonly the HC-SR04 ultrasonic sensor.
It is widely used in Arduino, robotics, automation and beginner electronics projects because it provides a simple way to detect the approximate distance between the sensor and an object. The standard HC-SR04 uses ultrasonic sound and measures the time taken for the sound to travel to an object and return. (Arduino Project Hub)
In this guide, we’ll understand:
- What an ultrasonic sensor is
- How ultrasonic waves work
- How the HC-SR04 measures distance
- What TRIG and ECHO pins do
- How the distance is calculated
- How to connect it to Arduino
- Simple Arduino code
- Real-world applications
- Common problems and mistakes
- Beginner project ideas
- How to choose an ultrasonic sensor
Let’s start with the basic idea.
What Is an Ultrasonic Sensor?
An ultrasonic sensor is an electronic device that uses high-frequency sound waves to detect objects and estimate their distance.
The word ultrasonic means sound waves with a frequency above the range normally heard by humans.
The HC-SR04 commonly operates using a 40 kHz ultrasonic signal. Its transmitter sends the ultrasonic sound, while its receiver detects the reflected sound. (IBOTS)
A very simple way to understand it is:
Send sound → Sound hits object → Sound comes back → Measure the time → Calculate distance
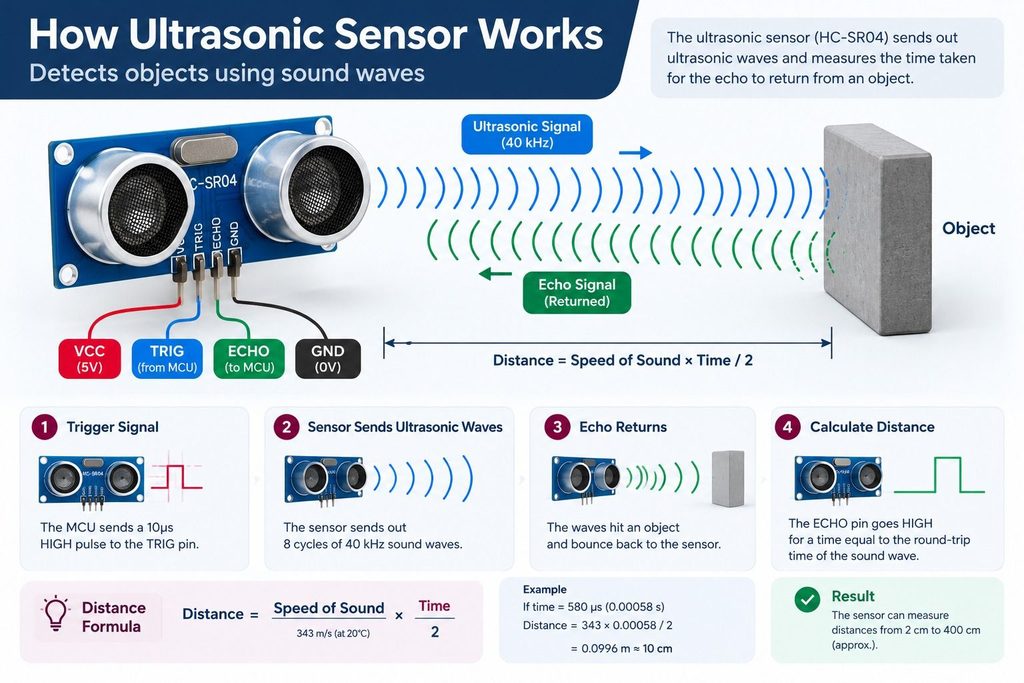
That’s the entire principle.
But there’s a clever bit hiding inside that simple process.
How Does an Ultrasonic Sensor See an Object?
An ultrasonic sensor doesn’t actually “see” an object like a camera does.
Instead, it sends sound waves.
When those waves encounter an object, some of the sound energy reflects back toward the sensor.
The sensor detects this returning signal and measures how long the complete journey took.
Think about shouting in front of a large wall.
You shout:
“Hello!”
The sound travels toward the wall.
It hits the wall.
Then some of the sound comes back as an echo.
If you knew:
- How fast the sound travels
- How long the echo took to return
you could estimate how far away the wall is.
An ultrasonic sensor does essentially the same thing electronically.
The Two “Eyes” of the HC-SR04
Look at an HC-SR04 sensor and you’ll notice two circular metal transducers.
They may look like eyes, but they have different jobs.
1. Transmitter
The transmitter sends the ultrasonic sound wave toward the object.
2. Receiver
The receiver listens for the sound wave after it reflects from the object.
So the basic flow is:
Transmitter
↓
Ultrasonic wave
↓
Object
↓
Reflected wave
↓
Receiver
This transmitter-and-receiver arrangement is what allows the sensor to perform a time-of-flight measurement. (Arduino Project Hub)
How Does the HC-SR04 Measure Distance?
Now let’s look at what happens step by step.
Step 1: The Microcontroller Sends a Trigger
An Arduino or another compatible microcontroller sends a short electrical pulse to the sensor’s TRIG pin.
A commonly used trigger pulse is about 10 microseconds. (Arduino Project Hub)
This tells the sensor:
“Start a new measurement.”
Step 2: The Sensor Sends Ultrasonic Waves
After receiving the trigger signal, the HC-SR04 sends a short burst of ultrasonic sound.
The commonly specified frequency is 40 kHz. (IBOTS)
Humans normally cannot hear this ultrasonic sound.
Step 3: The Sound Travels Toward the Object
The ultrasonic waves move through the air.
If there is an object in front of the sensor, the waves hit that object.
For example:
HC-SR04 Object
| |
| —- ultrasonic ——> |
| |
| <—- reflected ——- |
| |
Step 4: The Sound Bounces Back
When the ultrasonic waves hit a suitable surface, some of the sound reflects back.
The receiver on the HC-SR04 detects the returning signal.
Step 5: The ECHO Pin Changes
The sensor uses its ECHO pin to represent the time taken for the ultrasonic signal to travel out and return.
The microcontroller measures how long the ECHO signal remains HIGH.
That time is the key information required to calculate distance. (Arduino Project Hub)
The Important Formula
Now comes the part that makes the whole system work.
We know:
Distance = Speed × Time
But there’s one important detail.
The ultrasonic wave travels:
Sensor → Object
and then:
Object → Sensor
So the measured time represents twice the actual distance.
Therefore:
Distance = (Speed of Sound × Time) ÷ 2
For a simplified Arduino calculation:
Distance in cm ≈ Echo time in microseconds × 0.0343 ÷ 2
Another commonly used shortcut is:
Distance in cm ≈ Echo time ÷ 58
The division by two is essential because the measured time includes both the outgoing and returning journey. (iTechGuides)
Let’s Understand It With an Example
Suppose the sensor measures an echo time of approximately:
1,458 microseconds
Using the formula:
Distance = 1458 × 0.0343 ÷ 2
The result is approximately:
25 cm
So the object is approximately 25 cm away from the sensor. (Chip.pk)
This is the basic mathematical idea behind ultrasonic distance measurement.
You don’t need complicated mathematics to use the sensor.
The microcontroller can perform this calculation for you.
Meet the HC-SR04 Ultrasonic Sensor
If you’re looking for a simple ultrasonic sensor for beginner electronics and Arduino projects, the HC-SR04 is one of the commonly used modules.
Typical HC-SR04 specifications
| Feature | HC-SR04 |
| Operating voltage | 5V |
| Typical sensing range | 2–400 cm |
| Frequency | 40 kHz |
| Interface | TRIG + ECHO |
| Measurement type | Non-contact distance measurement |
| Transmitter | Ultrasonic |
| Receiver | Ultrasonic |
IBOTS currently lists its HC-SR04 with a 2–400 cm sensing range, 5V operating voltage, and 40 kHz frequency. (IBOTS)
Want to Try It Yourself?
If you’re learning Arduino, robotics or IoT, you can start experimenting with an HC-SR04 instead of only reading about the theory.
HC-SR04 Ultrasonic Sensor – IBOTS
The IBOTS HC-SR04 is designed for applications such as distance measurement, object detection, motion-related projects and robotic applications, and it can be interfaced with a microcontroller. (IBOTS)
👉 Get the HC-SR04 Ultrasonic Sensor from IBOTS
HC-SR04 Ultrasonic Sensor – IBOTS
This is a good place in the article to introduce the product because the reader has just learned what the sensor does and how it works.
Understanding the Four Pins
The standard HC-SR04 has four main pins.
| Pin | Function | Arduino Uno Example |
| VCC | Power | 5V |
| TRIG | Starts measurement | Digital Pin 9 |
| ECHO | Returns timing signal | Digital Pin 10 |
| GND | Ground | GND |
Let’s understand each one.
VCC
This supplies power to the sensor.
GND
This provides the common ground connection.
TRIG
This tells the sensor to start sending the ultrasonic pulse.
ECHO
This provides the timing information corresponding to the returning ultrasonic signal.
A typical Arduino connection uses VCC to 5V, GND to GND, and separate digital pins for TRIG and ECHO. (iTechGuides)
Connecting HC-SR04 to Arduino Uno
You don’t need a complicated circuit for a basic distance-measuring experiment.
Components Required
- Arduino Uno
- HC-SR04 Ultrasonic Sensor
- Breadboard
- Jumper wires
- USB cable
- Computer
Wiring
HC-SR04 Arduino Uno
VCC ———- 5V
GND ———- GND
TRIG ———- D9
ECHO ———- D10
For a standard Arduino Uno setup, this is enough to get started.
Important: The standard HC-SR04 is a 5V module. When connecting it to a 3.3V-only microcontroller such as an ESP32, check the board’s input-voltage requirements and use appropriate level shifting for the ECHO signal where required. This is an important safety consideration when moving beyond an Arduino Uno. (Compoden)
Simple Arduino Code
Once the sensor is connected, we can write a small program to display the measured distance.
const int trigPin = 9;

const int echoPin = 10;

void setup() {

  Serial.begin(9600);

  pinMode(trigPin, OUTPUT);

  pinMode(echoPin, INPUT);

}

void loop() {

  // Make sure trigger starts LOW

  digitalWrite(trigPin, LOW);

  delayMicroseconds(2);

  // Send trigger pulse

  digitalWrite(trigPin, HIGH);

  delayMicroseconds(10);

  digitalWrite(trigPin, LOW);

  // Measure echo time

  long duration = pulseIn(echoPin, HIGH);

  // Calculate distance

  float distance = duration * 0.0343 / 2;

  Serial.print("Distance: ");

  Serial.print(distance);

  Serial.println(" cm");

  delay(500);

}
The Arduino starts a measurement, reads the duration of the ECHO pulse and then converts that time into an approximate distance. This is the same basic measurement sequence used in beginner HC-SR04 tutorials. (Arduino Project Hub)
What Will You See?
Open the Serial Monitor in Arduino IDE.
You might see something like:
Distance: 48.32 cm
Distance: 47.98 cm
Distance: 48.21 cm
Distance: 48.10 cm
Now move your hand closer to the sensor.
You may see:
Distance: 30.45 cm
Distance: 25.81 cm
Distance: 20.17 cm
Distance: 15.93 cm
Move your hand away:
Distance: 35.20 cm
Distance: 42.15 cm
Distance: 55.83 cm
And suddenly, a sensor that looked like two little metal “eyes” becomes a distance-measuring device.
Pretty neat for a tiny module.
Why Doesn’t the Sensor Use a Camera?
This is another interesting question.
A camera can see an object, recognize its shape and capture an image.
An ultrasonic sensor works differently.
It mainly uses sound reflection and travel time to estimate distance.
That makes it useful when you don’t need an image—you simply need to know:
“How far away is something?”
For example:
- Is an obstacle nearby?
- Is the water level getting high?
- Is someone standing in front of the sensor?
- Is the dustbin getting full?
- Is a robot approaching an object?
In these situations, measuring distance can be enough.
Where Are Ultrasonic Sensors Used?
Ultrasonic sensors are useful in many electronics, robotics and automation applications.
1. Obstacle Avoiding Robots
A robot can use an ultrasonic sensor to detect an object in front of it.
Robot
↓
Ultrasonic Sensor
↓
Object detected
↓
Microcontroller
↓
Change direction
For example, if the measured distance becomes smaller than a chosen threshold, the robot can stop or turn.
2. Parking Assistance
A distance sensor can help detect how close a vehicle is to an obstacle.
The basic concept is:
Vehicle → Sensor → Distance measurement → Warning
A buzzer or display can then be used to provide an alert.Check this
3. Smart Dustbin
This is one of the most popular beginner project ideas.
An ultrasonic sensor can detect when a person’s hand approaches the dustbin.
The system can then activate a servo motor to open the lid.
Hand detected
↓
HC-SR04
↓
Arduino
↓
Servo Motor
↓
Dustbin opens
The sensor is therefore the input, while the servo motor is the output.
4. Water Level Monitoring
An ultrasonic sensor can be mounted above a water tank.
Instead of touching the water, the sensor measures the distance between itself and the water surface.
For example:
Sensor
↓
↓ Distance
———————–
Water
~~~~~~~~~~~~~~~~~~~~~~~
As the water level rises, the measured distance decreases.
The controller can use this information to:
- Display the level
- Trigger an alert
- Control a pump
- Send information to an IoT system
5. Automatic Doors
An ultrasonic sensor can be used as an input for systems that need to detect a nearby person or object.
The controller receives the distance information and can activate a motor or servo when the object enters a defined range.
6. Robotics Projects
Robotics is another major application.
An ultrasonic sensor can help a robot:
- Detect obstacles
- Measure distance
- Avoid collisions
- Navigate simple environments
- Trigger actions based on proximity
This is why HC-SR04 sensors are common in beginner robotics projects. (Circuit of Things)
What Can Affect Ultrasonic Sensor Readings?
An ultrasonic sensor is useful, but it isn’t magic.
The reading can be affected by the target and the surrounding environment.
1. Object Surface
Some materials reflect sound better than others.
A large, flat object facing the sensor is generally easier to detect than a small or awkwardly positioned target.
2. Object Angle
If the object is angled, the sound may reflect away from the sensor instead of returning directly to the receiver.
This can result in unstable or missing readings. (Wilteq)
3. Very Small Objects
Small objects may not reflect enough ultrasonic energy back toward the receiver.
4. Temperature
The speed of sound changes with air temperature.
Since the distance calculation depends on the speed of sound, temperature can influence the measurement. (iTechGuides)
For basic student projects, this usually isn’t a major concern, but it becomes important when higher measurement accuracy is required.
5. Multiple Ultrasonic Sensors
If several ultrasonic sensors operate very close to one another, their signals can potentially interfere with each other.
For projects using multiple sensors, measurements should be managed carefully. (Wilteq)
Common Beginner Mistakes
Mistake 1: Connecting TRIG and ECHO to the Wrong Pins
Always check your program and wiring.
If your code says:
trigPin = 9;
echoPin = 10;
then:
TRIG → D9
ECHO → D10
Mistake 2: Forgetting Common Ground
The sensor and Arduino need a proper common ground connection.
Mistake 3: Forgetting the Trigger Pulse
The sensor needs a trigger signal to begin a measurement.
Mistake 4: Forgetting the Divide-by-2
Remember:
Sound travels to the object AND back.
So:
Distance = Speed × Time ÷ 2
If you forget the /2, your calculated distance will be approximately twice the actual one. (iTechGuides)
Mistake 5: Expecting Perfect Readings Every Time
You might see:
30.12 cm
30.41 cm
29.87 cm
30.23 cm
That’s normal in a basic setup.
Real-world sensor readings can vary because of environmental conditions and the target surface.
Ultrasonic Sensor vs IR Sensor
Beginners often ask:
“Should I use an ultrasonic sensor or an IR sensor?”
Both can detect objects, but they work differently.
| Feature | Ultrasonic Sensor | IR Sensor |
| Uses | Sound waves | Infrared light |
| Common use | Distance measurement | Object/proximity detection |
| Measures distance | Yes, approximately | Depends on sensor type |
| Affected by light | Generally less than optical sensors | Can be affected by ambient IR/light |
| Common beginner use | Robot distance detection | Line/object detection |
| Example | HC-SR04 | IR obstacle sensor |
The important thing is to choose the sensor based on what your project actually needs.
Build More Than Just a Distance Meter
If you’re learning sensors, buying only one component is not always enough.
For example, an IoT or robotics project may require:
- A microcontroller
- Ultrasonic sensor
- Breadboard
- Jumper wires
- LEDs
- Buzzer
- Display
- Relay
- Other sensors
This is where a complete learning kit can be useful.
IBOTS Internet of Things Kit
The IBOTS Internet of Things Kit includes an HC-SR04 ultrasonic sensor along with an ESP8266 board, LCD, PIR sensor, LDR, MQ2 sensor, DHT11, soil moisture sensor, relay, pump, servo motor, Bluetooth module and other components. (IBOTS)
So instead of learning only distance sensing, you can experiment with several different types of sensors and automation concepts.
Explore the IBOTS Internet of Things Kit
This is a natural next step for learners who want to move from a single sensor experiment to complete IoT projects.
5 Beginner Projects Using an Ultrasonic Sensor
Once you understand the basic working principle, you can experiment with several projects.
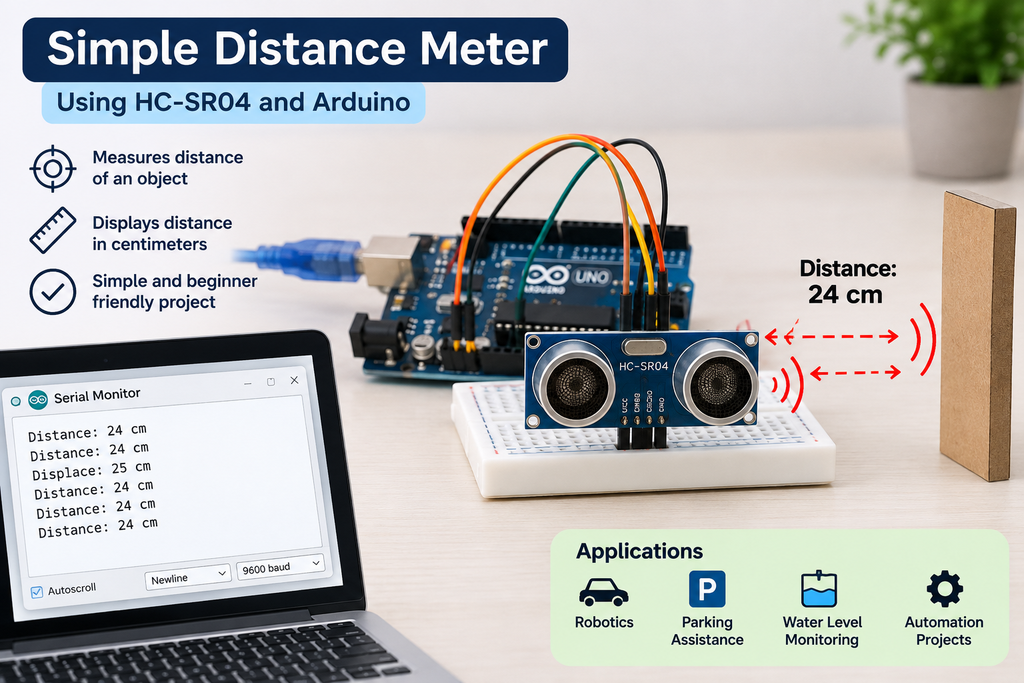
Project 1: Simple Distance Meter
HC-SR04 + Arduino + Serial Monitor
The Arduino continuously displays the distance.Project 1: Simple Distance Meter
Difficulty: ⭐
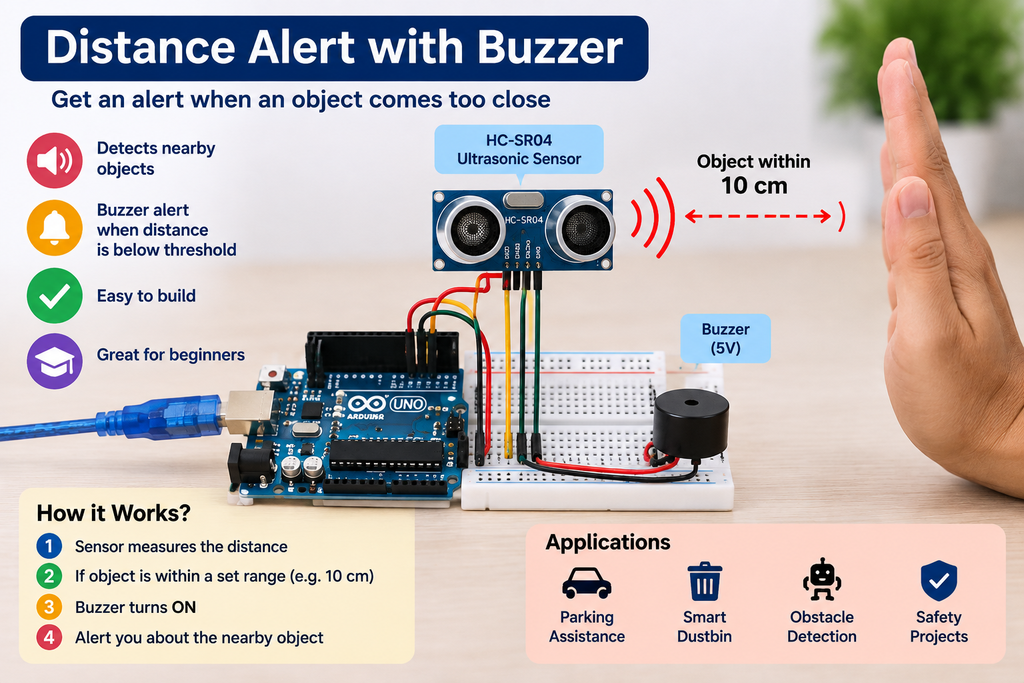
Project 2: Distance Alert
Add a buzzer.
When an object comes closer than a selected distance:
Object detected → Arduino → Buzzer ON
Difficulty: ⭐⭐
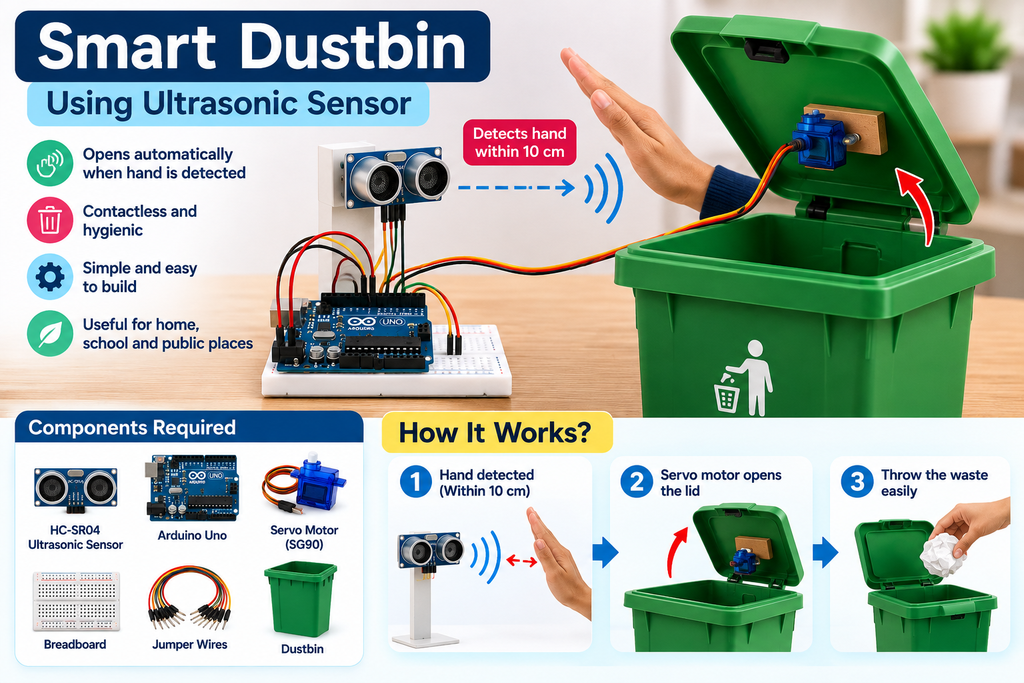
Project 3: Smart Dustbin
Use:
- HC-SR04
- Arduino
- SG90 Servo
- Dustbin
When a hand is detected:
Sensor → Arduino → Servo → Lid opens
Difficulty: ⭐⭐⭐
Project 4: Obstacle Avoiding Robot
Combine:
- HC-SR04
- Arduino
- Motor driver
- DC motors
- Robot chassis
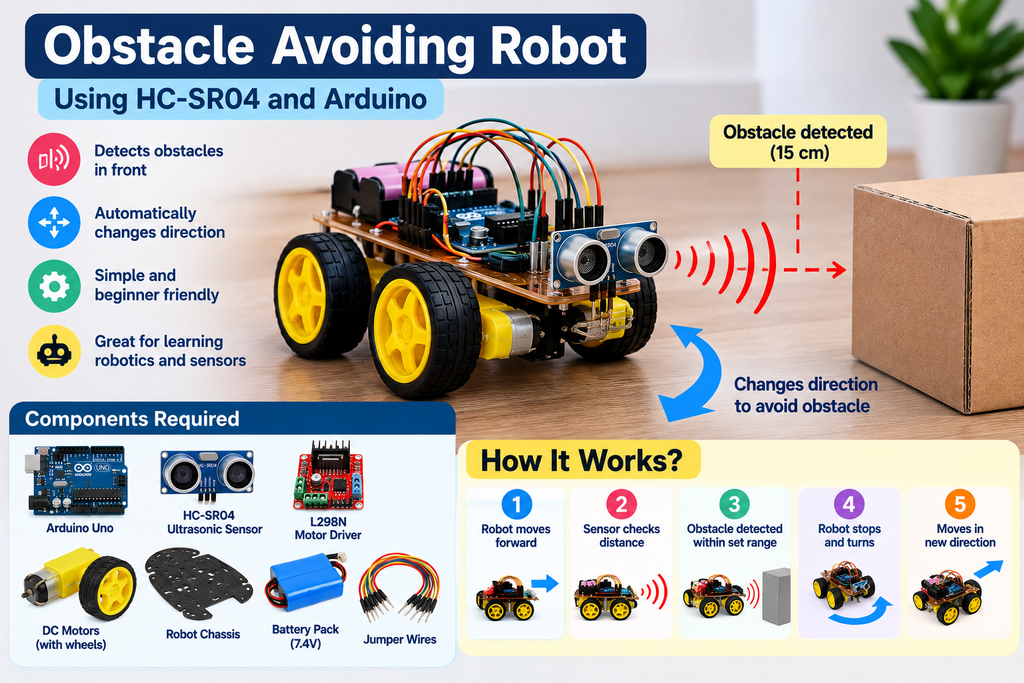
The robot measures the distance to obstacles and changes its movement accordingly.
Difficulty: ⭐⭐⭐⭐
Project 5: Water Level Monitoring
Use the ultrasonic sensor above a tank.
The sensor measures the distance to the water surface.
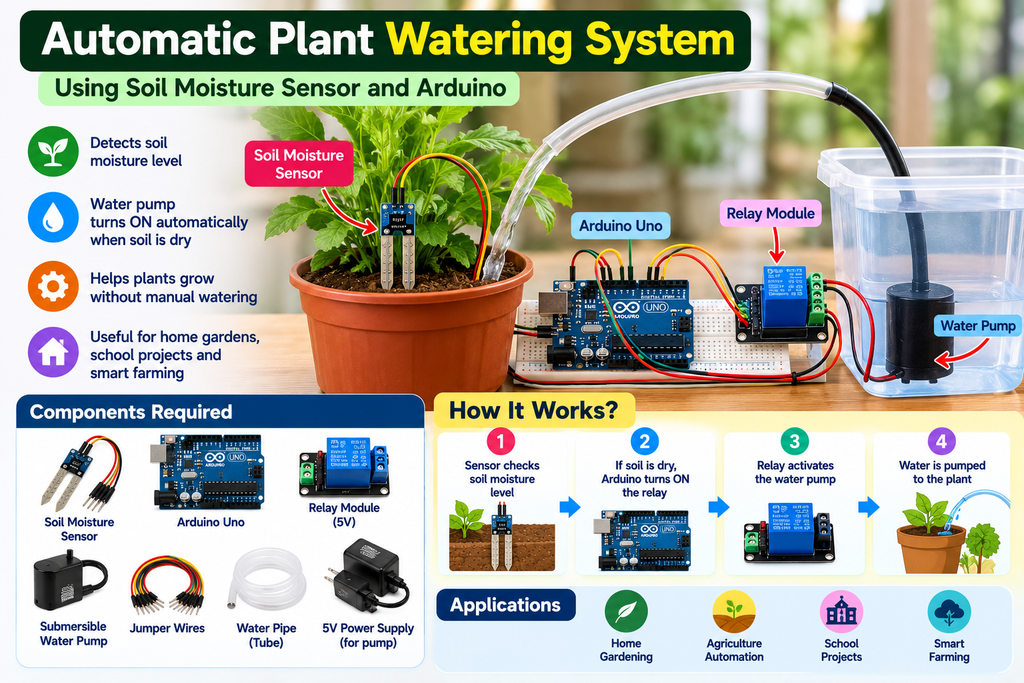
Then:
Distance → Water-level calculation → Display / Alert / Pump control
Difficulty: ⭐⭐⭐
From One Sensor to IoT
Here’s where the HC-SR04 becomes even more interesting.
Imagine a water tank that measures its level automatically.
Instead of simply displaying:
Water Level: 70%
you could send that information wirelessly.
The basic architecture becomes:
HC-SR04
↓
ESP8266
↓
Wi-Fi
↓
IoT Platform
↓
Mobile / Web Dashboard
Now the sensor isn’t just measuring distance.
It becomes part of an IoT monitoring system.
This is one reason ultrasonic sensors are useful for students moving from basic Arduino experiments toward IoT and automation.
Why Is HC-SR04 Popular for Learning?
There are several reasons beginners often start with this sensor.
Easy to Understand
Its working principle is intuitive:
Send → Reflect → Measure → Calculate
Simple Interface
The standard module uses four basic connections:
VCC, GND, TRIG and ECHO.
Useful for Projects
It can be used for:
- Robotics
- Automation
- Distance measurement
- Object detection
- Water-level projects
- Smart devices
Good Learning Value
One small sensor introduces several important concepts:
- Digital signals
- Timing
- Sensors
- Microcontrollers
- Speed of sound
- Distance calculation
- Automation
The IBOTS HC-SR04 is specified for approximately 2–400 cm sensing and is designed for microcontroller-based distance and object-detection applications. (IBOTS)
Frequently Asked Questions
What is an ultrasonic sensor?
An ultrasonic sensor uses high-frequency sound waves to detect objects and estimate their distance.
How does an HC-SR04 measure distance?
It sends an ultrasonic pulse, waits for the reflected signal, measures the round-trip travel time and converts that time into distance. (Arduino Project Hub)
What is the range of an HC-SR04?
The IBOTS HC-SR04 product is specified with a 2–400 cm sensing range. (IBOTS)
What is the frequency of HC-SR04?
The commonly specified operating frequency is 40 kHz. (IBOTS)
What are the four pins of an HC-SR04?
They are:
- VCC
- GND
- TRIG
- ECHO
Can I use HC-SR04 with Arduino?
Yes. HC-SR04 is commonly used with Arduino for distance measurement and robotics projects. (Arduino Project Hub)
Can HC-SR04 be used in robotics?
Yes. It can be used for obstacle detection, distance measurement and simple navigation projects. (Circuit of Things)
Can I use HC-SR04 in an IoT project?
Yes. You can connect the sensor to a suitable microcontroller such as an ESP8266 or other development board and use the measured data in an IoT application. When using 3.3V boards, check the logic-level requirements of the specific sensor and board. (Compoden)
Final Thoughts
An ultrasonic sensor may look like a small electronic component with two metal “eyes,” but it demonstrates a surprisingly powerful idea:
Use sound, measure time, and calculate distance.
The HC-SR04 turns this idea into a simple module that beginners can experiment with using Arduino and other microcontrollers.
Start with something simple like a distance meter.
Then add a buzzer.
Then try a smart dustbin.
Then experiment with a robot.
And eventually, you can connect the sensor to an IoT board and send the measurements wirelessly.
That’s the beauty of learning electronics — one small component can be the starting point for a much bigger project.